You are on a late shift in the Emergency Department (ED). A 28 year old normally well female presents with shortness of breath and wheezing on the background of a recent viral upper respiratory tract infection. She is a current smoker and has a history of childhood asthma.

The patient has audible wheeze from the end of the bed. The oxygen saturations of 94% on room air. She has been started on Salbultamol and Ipratropium Bromide nebulisers and has received 50mg (1mg/kg) of oral Prednisolone.
Feeling a bit rusty you locate the dusty spirometry machine and peak flow meter and bring it to the bedside… To help you here is some revision of basic ED pulmonary function tests:
What are the indications for spirometry and peak flow rate (PFR)?
Normally these tests should be performed in awake, cooperative patients where you want to know whether there is an ‘obstructive‘ lung disease, ‘restrictive‘ lung disease or both.
Key Point – Obstructive Lung Diseases include Asthma and COPD – these are associated with a prolonged expiratory time which can be measured by measuring the patient’s breathing
Respiratory function tests can give an indication of disease severity and be used in a serial manner to monitor your patient’s progress in the ED.
While there are many respiratory function tests, Spirometry and Peak Flow Rate are two most readily available at the bedside. They are both easy to perform and low in cost and therefore a good first test in the ED for patients with undifferentiated respiratory symptoms.
Spirometers may be ‘older’ mechanical (volume-displacement devices) or ‘modern’ electronic (flow-sensing) machines.
- The Mechanical Machines:
- Pros: accurate, simple and robust
- Cons: a reservoir of infections: so you MUST use a filter
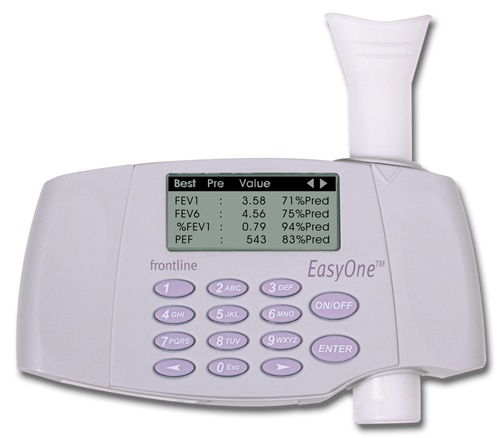
- The Electronic Machines:
- Can also produce ‘flow-volume curves‘.
- Have an electronic memory
- Normal ‘population values’ are built in to the system
- Pros: small and portable
- Cons: require frequent calibration and are more expensive

Important Respiratory Physiology
It is important to know a little something about the various ‘volumes’ you will be measuring with the Spriometry (usually in litres) or Peak Flow (usually in litres per minute). Bear with us…
Key Point – a ‘capacity’ is the sum of two volumes.
Volumes and Capacities

(1) The Tidal Volume (Vt)
- Tidal Volume is an important measure of ventilation.
- It’s basically the total volume of gas breathed in with each normal breath.
- Tidal Volume can be measured either in litres (spirometry) or millilitres (ventilatory support such as non-invasive ventilation or invasive positive pressure ventilation).
(2) The Vital Capacity (VC)
- Vital Capacity is the volume of gas breathed out from a maximum inspiration to a maximum exhalation.
- Measurements of Vital capacity are often referred to as ‘forced’ (FVC) or ‘forced vital capacity’ usually measured as volume (litres).
Key Point – ‘VC’ is an important measurement in spirometry. Reduction of FVC is often present in ‘restrictive’ lung diseases such as Pulmonary Fibrosis.
(3) The Residual volume (RV)
- Residual volume refers to the amount of gas remaining in the lungs at the end of a forced maximum expiration.
- Think of it as the air you can ‘never get out’…
- This measurement refers to the volume of gas can’t be breathed out even with a maximum effort.
(4) The Total Lung Capacity (TLC)
- Total Lung Capacity is the volume of gas in the lungs at the end of a maximum inspiration.
- The TLC is usually measured in litres.
- Total Lung Capacity is equal to the ‘residual volume + the vital capacity’
(5) Forced Expiratory Volume per 1 second (The FEV1)
- FEV1 is the volume of gas expired in the first second of a forced blow out by the patient
- This is an important value when working out whether the problem is ‘obstructive’
(6) Peak Expiratory Flow Rate (PFR, PEFR or ‘Peak Flow’)
- Peak Flow is the maximal flow rate of expired gas achieved during a forced expiration
- It is measured in L/min (volume over a period of time)
(7) Functional Residual Capacity (FRC)
- Functional Residual Capacity is the total volume of gas remaining in the lung at the end of a normal exhalation.
- Of interest in the ED, FRC is an important physiological ‘space’ for filling up with oxygen before an intubation. This is known as ‘pre-oxgenation’.
- FRC is equal to the sum of the ‘residual volume and the expiratory reserve volume’
(8) Inspiratory Reserve Volume (IRV)
- Inspiratory Reserve Volume is the volume of gas that would need to be inhaled on top of a normal total breath in order reach the ‘total lung capacity’
(9) Expiratory Reserve Volume (ERV)
- Expiratory Reserve Volume is the volume of gas that could be exhaled after a normal tidal breath. (It’s an important volume in terms of working out the FRC. (FRC = ERV and RC)
Bored? Don’t worry we’re done…
Onto the practical side
What types of ‘curves’ can you get when you do a Spirometry test?
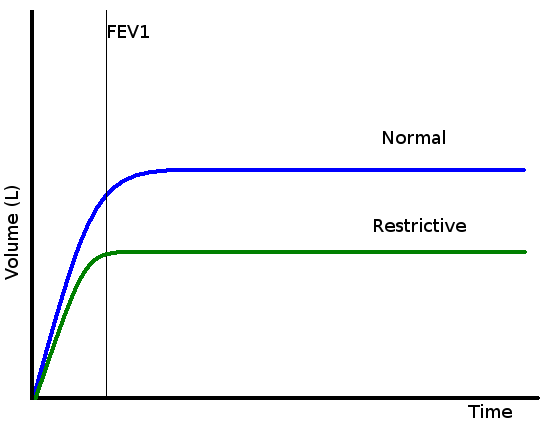
Pretty Simple – the main ones are a normal curve, restrictive curve (reduced size curve of normal ‘shape’) and an obstructive curve (normal total volume but less blown out in the first second)
Key Point – Work out whether the curve is ‘normal’, ‘obstructive’ or ‘restrictive’
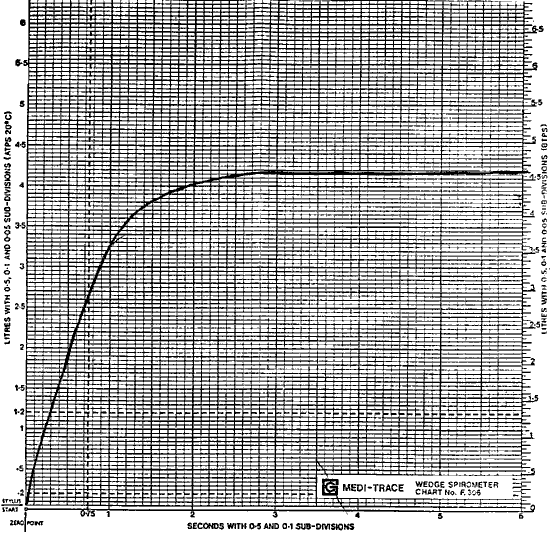
- A Normal Curve
- There differences in normal lung volumes between patients.
- These relate to height, age, race and sex of the patient.
- Most machines required you to input these parameters to estimate the ‘expected‘ result – you can then compare this with the ‘actual‘ result
- The normal ratio of the FEV1 to FVC is 80% (0.8) – in other words 80 percent of the forced breath should be blown out by the patient into the machine in the first second…
- A Restrictive Curve
- Clue – Full expiration will often occur quickly (within about 3 seconds)
- Total lung capacity is greatly reduced compared with expected
- Causes:
- Acute – ARDS, Viral
- Chronic – Any Chronic Lung Disease (e.g. Fibrosis, Sarcoidosis)
- An Obstructive Curve
- Clue – Full expiration will often will not have occurred by six seconds.
- Causes:
- COPD, Asthma, Bronchiectasis

How do I actually do Spirometry on my patient?
Start with the basics. Firstly, make sure that the machine has been recently serviced and is clean (wipe down if necessarily).
Many patients who you ask to do Spirometry will have previously performed the test. While this makes things easier, you may have to correct a previously “wrongly learned” technique.
Clear instruction and observation are important to ensure reliable results.
5 Steps:
Set up – Inspiration (full) – Good Seal – Expiration (forced) – Allow Patient Recovery
(1) Set up
- Hand hygiene
- Discard old mouthpiece
- Place a clean unused mouthpiece at the end of the Spirometry hose.
- Position your patient
- with the ‘sick’ patient just do the best you can (e.g. sitting on the edge of a bed)
- the patient should be standing if possible
- use a nose clip if you have one (textbooks say you should)
- With an old machine
- Place new graph paper in the carriage and reset the carriage to the start position.
- The patient’s name, date of birth and time of the test should be recorded
- With a new Electronic machine
- Input all the required information into the device with the keyboard
(2) Inspiration (full)
- Ask the patient to take as deep a breath as they can.
- Advise them that this should be away from the mouthpiece.
- Demonstrate the action of full inspiration to help the patient’s understanding
(3) Good Seal
- Instruct the patient to form a good seal and provide a lot of encouragement
- Most problems will arise from patients not understanding or not following the initial instructions
(4) Expiration (Forced)
- Tell the patient to exhale into the mouthpiece as forcefully as they can
- They need to keep going until ‘the lungs are empty’
- Ensure a maximum effort for the entire duration of exhalation
- You need to keep testing the patient until you get adequate results.
- A minimum of three ‘acceptable tests’ within about 5% variation of each other is required to allow for a valid interpretation.
(5) Let the Patient Recover
- Between each attempt you need to given the patient some space and rest
- Patients many unpleasant symptoms while doing the spirometry test from breathlessness to syncope (be prepared)…
- If symptoms are very severe you may have to abort further testing.
- Document this in the notes.
- When you have completed testing, discard the mouthpiece and/or filter
- Return the clean spirometer to its home ready for the next user.
What is considered an adequate test?
- Patient takes a full breath in
- Evidence of a maximum effort
- No coughing or stalling due to closure of the epiglottis
- No leak
- Patient takes a full breath out
- Reproducible results
How do I measure Peak Flow Rate (PFR) on a patient?
To do a measurement of the Peak Expiratory Flow Rate ask the patient to blow out as hard as they can with a good seal into a peak flow meter. The simplest way to do this is with a Peak Flow Meter. Peak flow meters used to be large and cumbersome but plastic hand-held “Mini-Wright” peak flow meters have made the job easier in recent years.
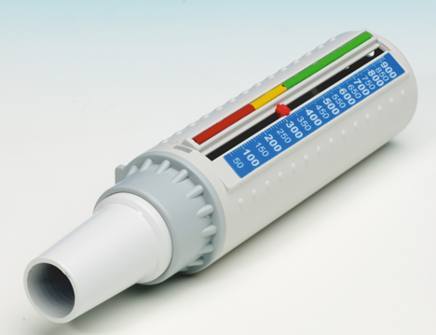 Peak flow meters are only capable of measuring a single parameter but are reasonably precise and reproducible. The great advantage of the peak flow meter lies in home self-monitoring and recording, especially in asthma patients.
Key Point – A PFR measurement requires close observation of the patient’s technique.
5 Steps:
Set up – Inspiration (full) – Good Seal – Peak Flow Effort – Allow Patient Recovery
(1) Set up
- Hand hygiene
- Use a fresh filter and mouthpiece
(2) Inspiration (full)
- Ask the patient to breathe in fully
(3) Good Seal
(4) Peak-flow Effort
- Ask the patient to place their lips around the outside of the mouthpiece
- Ask them to give a short sharp blow.
(5) Rest
To obtain a good result:
- The patient should hold the peak flow meter flat and still
- Take multiple readings to ensure consistent results
- Very unwell patients may not be able to achieve a results – this in itself is a bad sign!
Interpretation of Results
- Use the best result to calculate Peak flow
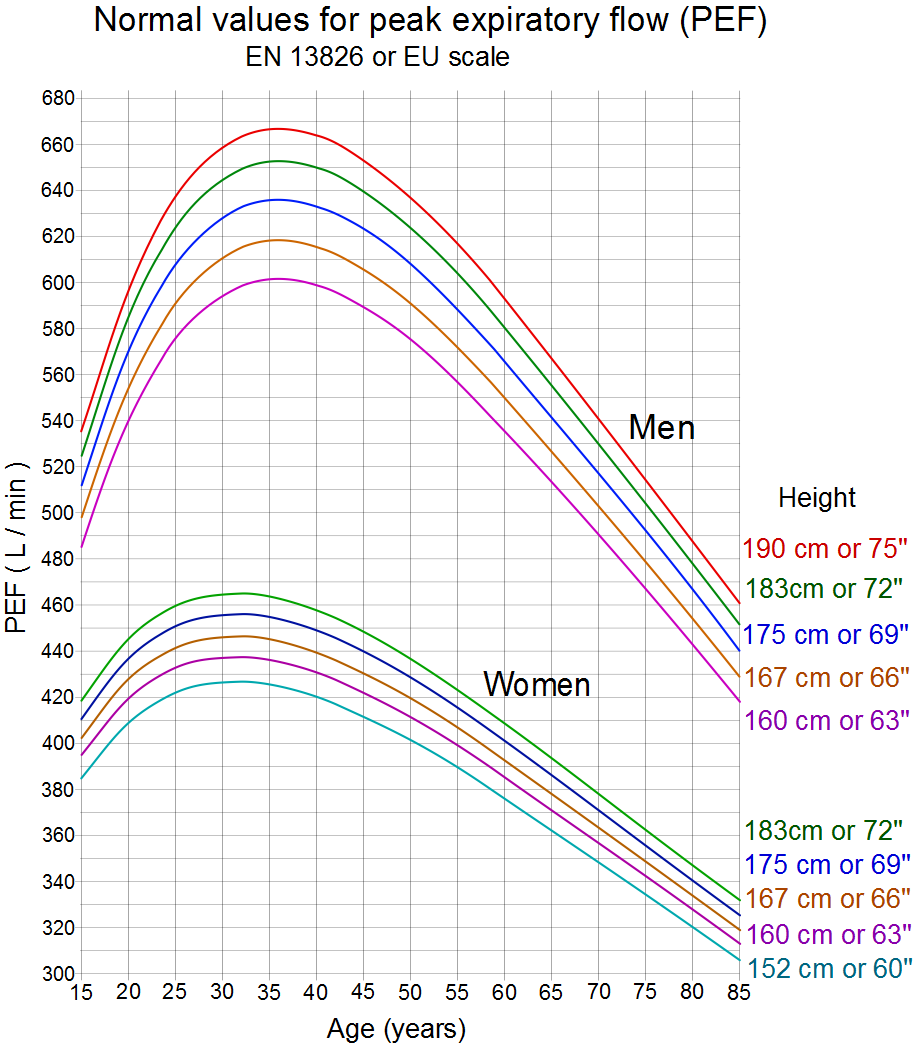
- Use this number to work out the current flow as percentage of the patient’s predicted value
- For example they scored 400L/min and you expect 500L/min this would be 80% of the predicted value for Peak Flow
- The Predicted value is base on height and sex:
- Click Here for a ‘predicted value’ calculator
- Where available compare the patient’s current peak flow rate with their normal value from previous results at home when they are well (ask them – they often know).
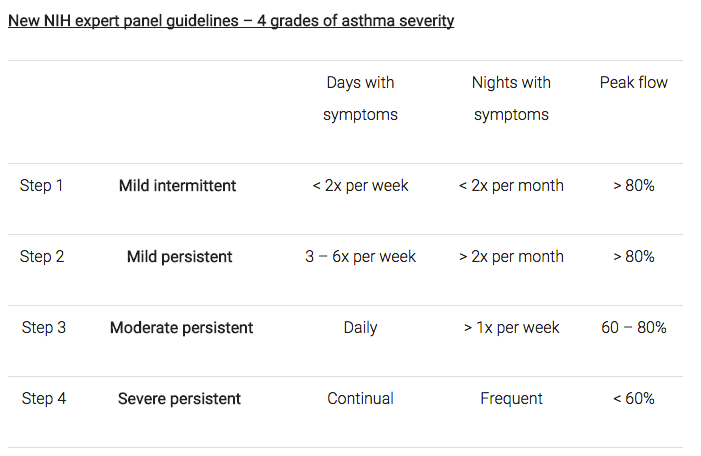
Using Peak Flow as a guide to Asthma Severity:
Summary
- Peak Flow Rate and Spirometry remain useful beside tests in the ED
- Important values include FEV1, FVC and the ratio of these measurements
- Common uses of these tests include:
- Asthma Diagnosis
- Asthma Monitoring
- COPD Monitoring
- COPD Exacerbation Diagnosis
- Diagnosis of Restrictive Lung Disease
- The keys to success are good patient instruction and encouragement
- Be patient with the patient
- Don’t forget about filters and hand hygiene to prevent infection spreading
